Single sign-on with Duo
Let your team sign in to OGDESK through Duo Single Sign-On: add OGDESK as a Generic OIDC Relying Party, then connect it here.
Who can do this:Tenant AdministratorDuo administrator
This guide connects Duo Single Sign-On to OGDESK over OpenID Connect, which is the simpler way. If you prefer SAML, see Using SAML instead at the end.
| Part | Where | What you do |
|---|---|---|
| A | OGDESK | Verify your email domain. |
| B | Duo | Add OGDESK as a Generic OIDC Relying Party, and give the groups who need it access. |
| C | OGDESK | Enter the application’s details. |
| D | Both | Test it, then require it if you want to. |
Before you start
- In Duo: an administrator who can add applications in the Duo Admin Panel.
- Duo Single Sign-On set up with an authentication source that knows people’s email addresses: Duo Directory, Active Directory, or a SAML identity provider.
- In OGDESK: the Tenant Administrator role.
- Permission to add a TXT record to your domain’s DNS.
- Your own OGDESK account on the domain you will verify, so you can test it yourself.
- Everybody who will sign in must already be a member of your OGDESK workspace. Invite them first.
Part A — Verify your email domain in OGDESK
Step 1: In OGDESK, go to Administration → App settings → Single sign-on.
Step 2: Under Email domains, type your domain and choose Claim.
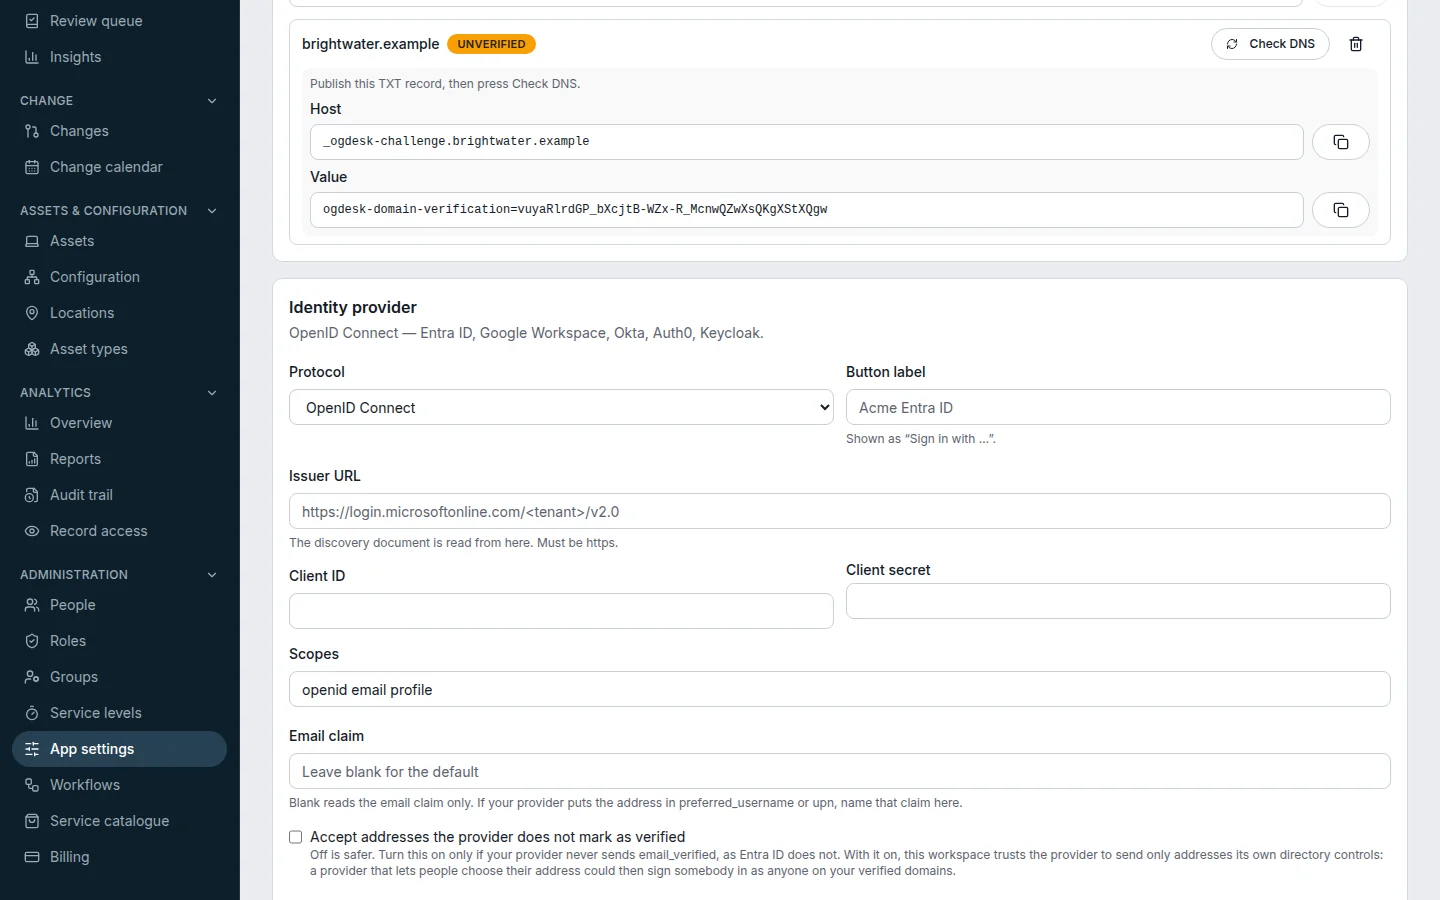
Step 3: Publish the TXT record shown at your DNS provider, using the Host and Value exactly as they appear.
Step 4: Choose Check DNS until the domain shows Verified.
Part B — Add OGDESK in Duo
Step 1: In the Duo Admin Panel, go to Applications → Application Catalog. Find Generic OIDC Relying Party (the entry labelled SSO) and choose + Add.
Step 2: Set the application’s Name to
OGDESK.Step 3: From the Metadata section, copy the Client ID, the Client Secret and the Issuer.
The issuer looks like
https://sso-xxxxxxxx.sso.duosecurity.com/oidc/<client ID>. If you reset the client secret later, the old one stops working, so update OGDESK at the same time.Step 4: Under Relying Party, paste
https://www.ogdesk.com/api/v1/auth/sso/callback/oidcinto Sign-In Redirect URLs. Leave Grant Type on Authorization Code.Copy it from Redirect / ACS URL in OGDESK if your address is different.
Step 5: Under Scopes, tick profile and email. openid is always on.
Without email, Duo sends no address and OGDESK cannot tell who is signing in.
Step 6: Under User access, choose the Duo groups who may use OGDESK, or enable it for all users.
Duo lets nobody into a new application until you grant access.
Step 7: Scroll to the bottom of the page and choose Save.
Part C — Enter the application’s details in OGDESK
Back on the Single sign-on tab, under Identity provider:
| Field | What to enter |
|---|---|
| Protocol | OpenID Connect |
| Button label | Duo, so the sign-in button reads “Sign in with Duo” |
| Issuer URL | Duo’s Issuer, ending in the client ID |
| Client ID | Duo’s Client ID |
| Client secret | Duo’s Client Secret |
| Scopes | Leave as openid email profile |
| Email claim | Leave blank |
| Accept addresses the provider does not mark as verified | Tick it (see the note below). |
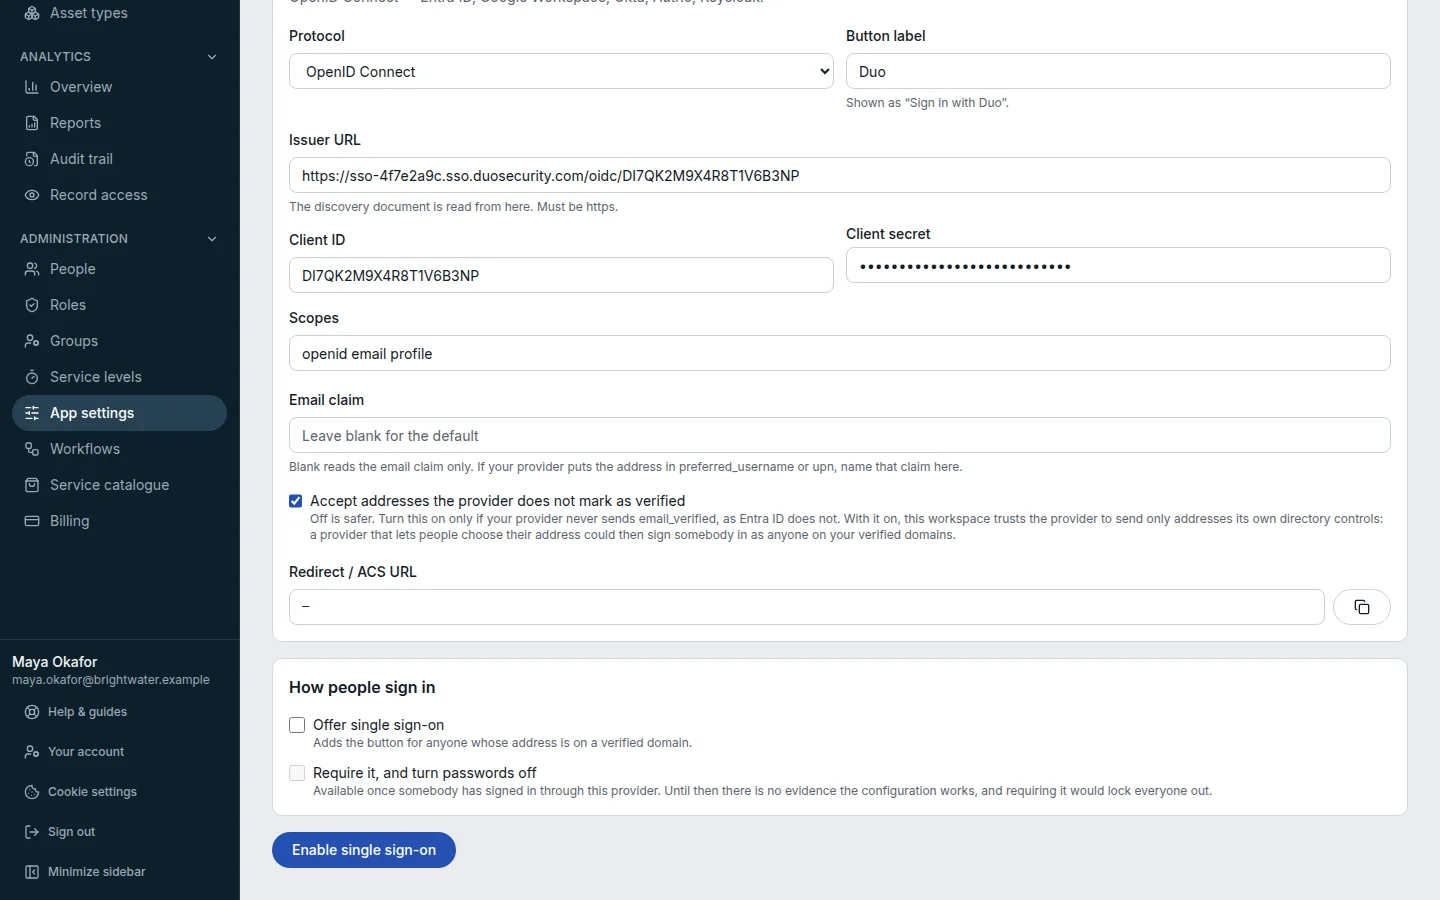
Choose Enable single sign-on to save.
Part D — Test it, then require it
Step 1: Under How people sign in, tick Offer single sign-on and save.
Step 2: In a private browser window, open the OGDESK sign-in page, type your work email, choose Continue, then Sign in with Duo. Sign in at Duo and approve the Duo prompt.
Step 3: On the Single sign-on tab, Last successful sign-in confirms it worked. If not, Last attempt says why. Passwords keep working while you test.
Step 4: Once it works, you can tick Require it, and turn passwords off. See Set up single sign-on for what that changes.
Common problems
| What you see | What to do |
|---|---|
| A redirect URL error at Duo | Sign-In Redirect URLs does not match OGDESK’s. Copy it again, and save the application in Duo. |
| Duo says you do not have access | The person is not in a group with User access to the OGDESK application. |
| “Your identity provider did not say whether it has verified your email address…” | Tick Accept addresses the provider does not mark as verified (Part C). |
| “Your identity provider did not send an email address.” | Tick the email scope in Duo, and check the person has an address in your authentication source. |
| “…an address this workspace has not verified.” | The person’s address in Duo is on a domain you have not verified in OGDESK. Verify it, or fix their address. |
| “That account is not a member of this workspace.” | Invite them to OGDESK first. |
| Sign-in stopped working after a change in Duo | If somebody chose Reset Client Secret, paste the new secret into OGDESK. |
Using SAML instead
Step 1: In OGDESK, save the provider with protocol SAML 2.0 first, so Redirect / ACS URL and Our entity ID appear.
Step 2: In the Duo Admin Panel, go to Applications → Application Catalog, find Generic SAML Service Provider (labelled SSO), and choose + Add.
Step 3: Under Service Provider, leave Metadata Discovery on None (manual import). Set Entity ID to OGDESK’s Our entity ID, and Assertion Consumer Service (ACS) URL to OGDESK’s Redirect / ACS URL.
Step 4: Under SAML Response, set NameID format to
urn:oasis:names:tc:SAML:1.1:nameid-format:emailAddress(the same as OGDESK’s NameID format) and NameID attribute to <Email Address>. Leave Signature Algorithm on SHA-256.Step 5: Keep both Sign response and Sign assertion ticked under Signing Options, and leave Encrypt the SAML assertion off.
OGDESK refuses anything that is not signed in both places. Both are ticked by default.
Step 6: From the Metadata section, copy Single Sign-On URL into OGDESK’s Sign-on URL, Entity ID into IdP entity ID, and the certificate (Copy certificate) into Signing certificate.
Step 7: Grant User access, choose Save, and test it as in Part D.