Single sign-on with OneLogin
Let your team sign in to OGDESK through OneLogin: add OGDESK as an OpenID Connect app, then connect it here.
Who can do this:Tenant AdministratorOneLogin administrator
This guide connects OneLogin to OGDESK over OpenID Connect, which is the simpler way. If you prefer SAML, see Using SAML instead at the end.
| Part | Where | What you do |
|---|---|---|
| A | OGDESK | Verify your email domain. |
| B | OneLogin | Add OGDESK as an OpenID Connect app, and give it to the people who need it. |
| C | OGDESK | Enter the app’s details. |
| D | Both | Test it, then require it if you want to. |
Before you start
- In OneLogin: an administrator who can add apps and assign them to people.
- In OGDESK: the Tenant Administrator role.
- Permission to add a TXT record to your domain’s DNS.
- Your own OGDESK account on the domain you will verify, so you can test it yourself.
- Everybody who will sign in must already be a member of your OGDESK workspace. Invite them first.
Part A — Verify your email domain in OGDESK
Step 1: In OGDESK, go to Administration → App settings → Single sign-on.
Step 2: Under Email domains, type your domain and choose Claim.
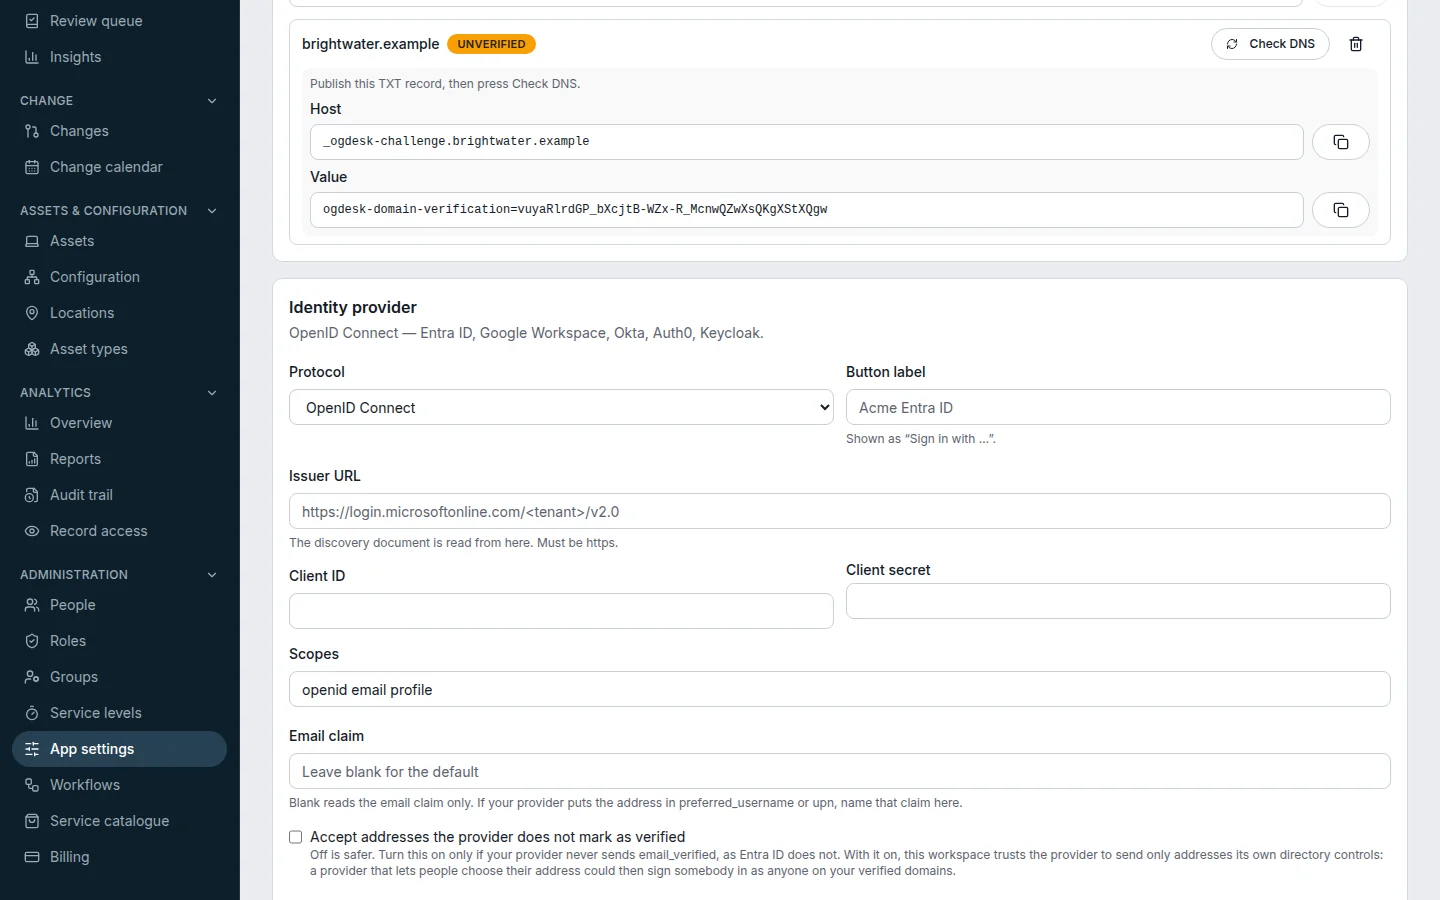
Step 3: Publish the TXT record shown at your DNS provider, using the Host and Value exactly as they appear.
Step 4: Choose Check DNS until the domain shows Verified.
Part B — Add OGDESK in OneLogin
Step 1: In the OneLogin admin portal, go to Applications → Applications and choose Add App. Search for
OpenId Connectand choose OpenId Connect (OIDC).Step 2: Set Display Name to
OGDESKand choose Save.Step 3: On the Configuration tab, paste
https://www.ogdesk.com/api/v1/auth/sso/callback/oidcinto Redirect URI's, and choose Save.Copy it from Redirect / ACS URL in OGDESK if your address is different. Optionally set Login Url to your OGDESK sign-in page, so the app’s tile in the OneLogin portal opens OGDESK. A changed redirect can take up to ten minutes to apply.
Step 4: On the SSO tab, copy the Client ID, choose Show client secret and copy the Client Secret, and copy the Issuer URL.
The issuer looks like
https://yourcompany.onelogin.com/oidc/2. Leave Application Type as Web and Token Endpoint as Basic.Step 5: Give the app to the people who need it: either open each person under Users, go to Applications and add OGDESK, or add OGDESK to a Role on the app’s Access tab and give people that role.
OneLogin turns away anybody it has not given the app to, before they reach OGDESK.
Part C — Enter the app’s details in OGDESK
Back on the Single sign-on tab, under Identity provider:
| Field | What to enter |
|---|---|
| Protocol | OpenID Connect |
| Button label | OneLogin, so the sign-in button reads “Sign in with OneLogin” |
| Issuer URL | OneLogin’s Issuer URL, ending in /oidc/2 |
| Client ID | OneLogin’s Client ID |
| Client secret | OneLogin’s Client Secret |
| Scopes | Leave as openid email profile |
| Email claim | Leave blank |
| Accept addresses the provider does not mark as verified | Tick it, unless you have set up OneLogin’s email_verified claim (see below). |
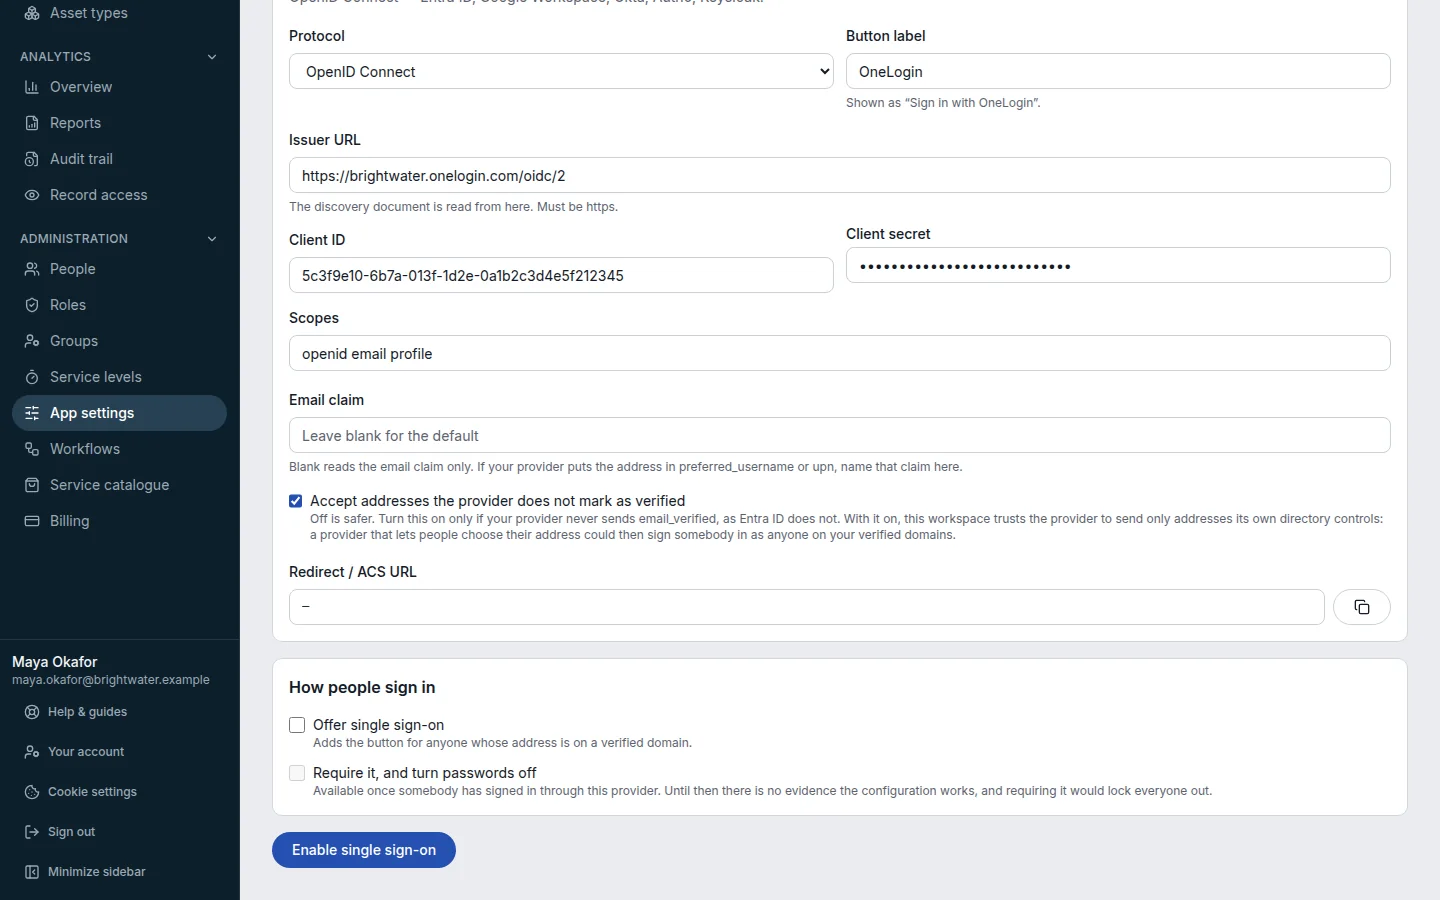
Choose Enable single sign-on to save.
Part D — Test it, then require it
Step 1: Under How people sign in, tick Offer single sign-on and save.
Step 2: In a private browser window, open the OGDESK sign-in page, type your work email, choose Continue, then Sign in with OneLogin.
Step 3: On the Single sign-on tab, Last successful sign-in confirms it worked. If not, Last attempt says why. Passwords keep working while you test.
Step 4: Once it works, you can tick Require it, and turn passwords off. See Set up single sign-on for what that changes.
Common problems
| What you see | What to do |
|---|---|
| A redirect_uri error at OneLogin | The Redirect URI's entry does not match OGDESK’s. Copy it again, save, and allow up to ten minutes. |
| OneLogin says you do not have access | The person has not been given the OGDESK app, directly or through a Role. |
| “Your identity provider did not say whether it has verified your email address…” | Tick Accept addresses the provider does not mark as verified (Part C). |
| “…an address this workspace has not verified.” | The person’s OneLogin email is on a domain you have not verified in OGDESK. Verify it, or fix their address. |
| “Your identity provider did not send an email address.” | Check the person has an email address in OneLogin, and that Scopes includes email. |
| “That account is not a member of this workspace.” | Invite them to OGDESK first. |
Using SAML instead
Step 1: In OGDESK, save the provider with protocol SAML 2.0 first, so Redirect / ACS URL and Our entity ID appear.
Step 2: In OneLogin, choose Add App, search for
SAML Custom Connector (Advanced), name itOGDESK, and save.Step 3: On the Configuration tab, set Audience (EntityID) to OGDESK’s Our entity ID, and Recipient and ACS (Consumer) URL to OGDESK’s Redirect / ACS URL.
Step 4: Set ACS (Consumer) URL Validator to the same address written as a pattern:
^https:\/\/www\.ogdesk\.com\/api\/v1\/auth\/sso\/callback\/saml$Step 5: Set SAML nameID format to Email, and SAML signature element to Both.
OGDESK refuses anything that is not signed in both places.
Step 6: On the SSO tab, copy SAML 2.0 Endpoint (HTTP) into OGDESK’s Sign-on URL, Issuer URL into IdP entity ID, and the X.509 Certificate (under View Details) into Signing certificate.
Step 7: Give the app to people, as in Part B, and test it as in Part D.